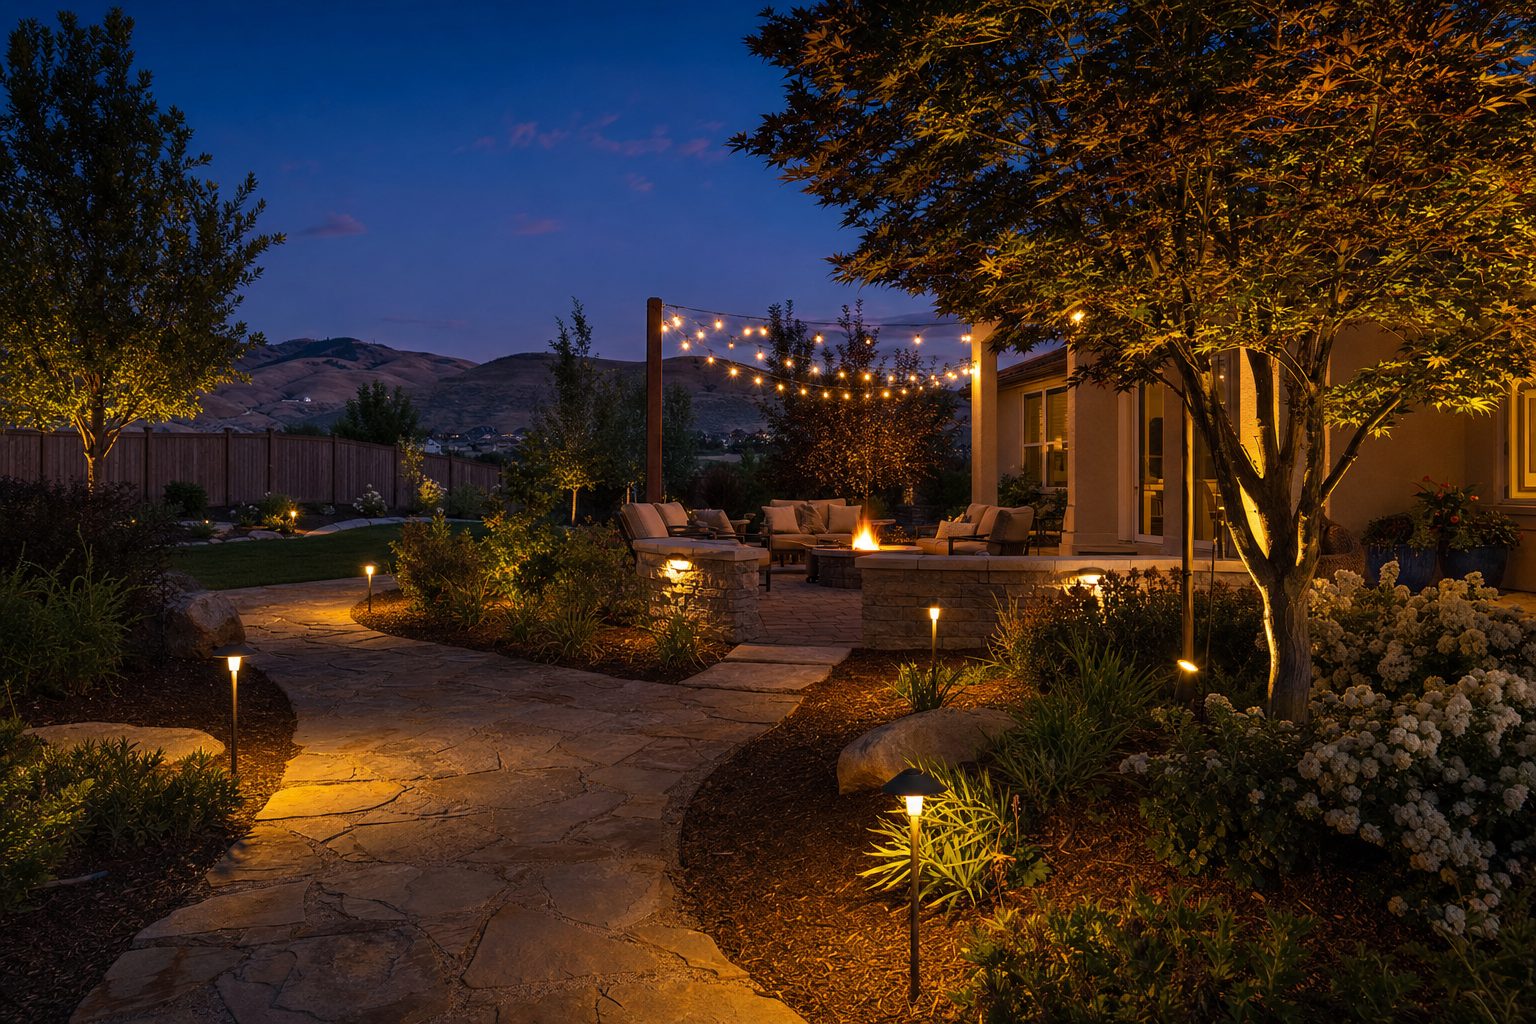
In the Treasure Valley, the sun sets before 6 PM for nearly four months of the year. From early November through late February, Boise sees roughly 9.5 hours of daylight — meaning your landscape is invisible during most of your waking hours at home. Well-designed landscape lighting extends the usability of your outdoor spaces, improves safety on icy walkways, and adds dramatic curb appeal during the season when your yard needs it most.
Why landscape lighting matters in Idaho
Boise sits at 43.6°N latitude — far enough north that winter days are short and summer days are long. In December, sunset arrives as early as 5:09 PM. In June, it lingers until 9:28 PM. This extreme seasonal variation means your lighting strategy should serve two very different purposes: in summer, it creates ambiance for late-evening outdoor dining; in winter, it provides essential safety and curb appeal during months when your landscape is otherwise dormant and dark.
There is also a security dimension. The Boise Police Department recommends exterior lighting as one of the most effective deterrents to property crime. Motion-activated fixtures at side yards and rear entries, combined with consistent low-level path lighting, eliminate the dark approaches that invite opportunistic crime.
Lighting types and where to use them
Different lighting techniques serve different purposes. A well-designed system combines three to five types — never just one. Here is what each does and where it works in a Treasure Valley yard:
Path and walkway lighting
The foundation of any landscape lighting plan. Path lights are typically 18–24 inches tall, placed along walkways, driveways, and garden edges. They use 2–4 watt LED bulbs and cast a soft pool of light downward. In Idaho winters, path lighting is critical — ice patches form on north-facing walkways that get no sun, and a lit path helps you see hazards before you step on them.
Placement: Space fixtures 6–8 feet apart along curves, 8–10 feet on straight runs. Stagger them on opposite sides of wide paths for even coverage. Avoid the "runway" look — a straight line of identical lights on both sides looks institutional, not residential.
Uplighting (spot and accent)
Uplighting is the most dramatic technique in landscape lighting. Fixtures placed at the base of trees, walls, or architectural features aim upward to create shadows, highlight texture, and make plants look larger than life. It is especially effective on mature trees — something many Treasure Valley neighborhoods in North Boise, Eagle, and Star are rich with.
Best targets: Japanese maples (Acer palmatum) with their sculptural branch structure, river birch (Betula nigra) with peeling bark, and columnar junipers. Uplight from two angles for large trees (30+ feet) to avoid harsh shadows. Use 4–7 watt LED well lights for trees up to 20 feet, 7–15 watts for larger specimens.
Downlighting (moonlighting)
Downlighting mimics moonlight by placing fixtures high in trees and aiming them downward through the canopy. The result is a dappled, natural-looking light on the ground below — soft, romantic, and very different from the harsh glare of overhead floodlights. Downlighting is ideal for patios, seating areas, and lawns where you want ambient light without visible fixtures.
Installation note: Mount fixtures 15–25 feet up, angled 30–45 degrees downward. Use a glare shield to prevent direct eye-level visibility of the bulb. This requires a mature tree with a strong horizontal branch — common in established Boise neighborhoods like the North End and Harrison Boulevard.
Hardscape and step lighting
Built into walls, steps, and patio edges, hardscape lights are recessed or surface-mounted fixtures that illuminate grade changes without visible light sources. They are essential for safety on retaining walls, deck stairs, and raised patios — all common features in Treasure Valley landscapes that address slope and grade changes.
Options: Recessed step lights (2–3 watts, integrated LED), strip lighting under cap stones, and eyebrow lights that tuck under wall caps. Expect to pay more for hardscape fixtures because they need to be planned during wall construction, not added later.
String and bistro lighting
String lights have become the signature of outdoor living spaces in the Treasure Valley. They provide warm, festive ambiance over patios, pergolas, and outdoor kitchens. While not a replacement for functional path and accent lighting, they extend the usability of outdoor rooms well into the evening.
Practical tip: Use commercial-grade LED string lights with replaceable bulbs (G40 or Edison style), not cheap holiday lights. Suspend them between posts, pergola beams, or tree branches using aircraft cable for a taut, professional look. Solar-powered string lights work for small patios but struggle in Idaho winters when sunlight is limited.
Low-voltage vs. line-voltage vs. solar
Three power options exist for landscape lighting, each with tradeoffs. For most Treasure Valley homeowners, low-voltage is the right choice — but understanding the alternatives helps you decide.
| Type | Voltage | Best for | Pros | Cons |
|---|---|---|---|---|
| Low-voltage | 12V DC | Most residential yards | Safe to install yourself, energy-efficient, dimmable, large fixture selection | Requires transformer, wire runs, voltage drop planning |
| Line-voltage | 120V AC | Large properties, flood lighting | Bright, no voltage drop, permanent | Requires licensed electrician, buried conduit, permits |
| Solar | Battery | Small beds, remote spots | No wiring, no electricity cost | Dim output, unreliable in Idaho winters (short daylight), batteries fail after 2–3 years |
Solar lights struggle in Idaho winters. Boise averages 3.7 hours of direct sun in December versus 11.5 hours in July. Solar path lights that shine brightly all night in July may only last 2–3 hours in December — right when you need them most. If you rely on solar, supplement with a few low-voltage fixtures on key walkways for winter reliability.
Designing your lighting plan
A good landscape lighting plan follows the same principles as interior lighting: layering. You need ambient light (overall glow), task light (paths, steps, cooking areas), and accent light (drama, focal points). Here is a step-by-step approach:
1. Start with safety
Walk your property at night with a flashlight. Identify every step, grade change, and potential ice hazard. These are your mandatory lighting points. In the Treasure Valley, north-facing walkways and shaded driveways are ice-prone from November through March — prioritize these first.
2. Identify focal points
Pick 3–5 features you want to highlight at night: a mature tree, a water feature, a stone wall, architectural columns, or a specimen plant. These get uplight or accent fixtures. Everything else gets subtle, functional light. The goal is contrast — bright focal points against a darker background create visual interest.
3. Choose your light temperature
LED bulbs come in different color temperatures, measured in Kelvin (K). For landscape lighting, 2700K–3000K (warm white) is the standard. It creates a welcoming, natural look that complements stone, wood, and plant foliage. Avoid 4000K+ (cool white) — it looks harsh, clinical, and unflattering on skin tones. The one exception: moonlighting effects can use 3500K–4000K to simulate actual moonlight, which is cooler than incandescent light.
4. Plan wire runs to avoid voltage drop
Low-voltage systems lose voltage over distance. If a fixture is too far from the transformer, it will be dim. The rule of thumb: keep total wire runs under 100 feet from the transformer for a 12V system, or use a 15V tap on a multi-tap transformer for runs up to 200 feet. Use 12-gauge wire for main runs, 16-gauge for short branches. Daisey-chain fixtures in a loop (not a single long line) to balance the load.
5. Size your transformer
Add up the wattage of all fixtures, then add 20% for future expansion. A system with 20 fixtures at 4 watts each needs at least an 80-watt transformer (20 × 4 = 80, × 1.2 = 96 — round up to a 100W or 150W unit). Buy a transformer with a built-in photocell (auto on at dusk) and astronomical timer (adjusts for seasonal sunset changes — critical in Idaho where sunset shifts by 4+ hours between seasons).
What it costs in the Treasure Valley
Landscape lighting costs vary widely based on system size, fixture quality, and whether you install it yourself or hire a professional. Here are realistic ranges for Treasure Valley homeowners in 2026:
| Scope | DIY cost | Professional install | What is included |
|---|---|---|---|
| Basic path lighting | $200–$500 | $800–$1,500 | 8–12 path lights, transformer, wire, timer |
| Front yard curb appeal | $500–$1,200 | $2,000–$4,500 | Path lights, 4–6 uplights on trees, transformer, timer |
| Full property (front + back) | $1,200–$3,000 | $5,000–$12,000 | Paths, uplights, downlights, hardscape step lights, patio string lights, zones |
| Premium estate | $3,000–$6,000 | $15,000–$35,000+ | Full design, smart controls, DMX dimming, water feature lighting, architectural facade lighting |
Professional installation in the Boise area typically runs $75–$125 per fixture installed, including wire, connections, and transformer setup. Most landscape lighting companies in the Treasure Valley operate as divisions of larger landscape design firms — the same companies that build your patio or retaining wall often install the lighting too.
Winter considerations specific to the Treasure Valley
Idaho winters create specific challenges for landscape lighting that homeowners in Phoenix or Los Angeles never face:
Snow and ice coverage
Path lights buried under snow do not function. If your fixtures are 18 inches tall and you get a 12-inch snowfall (as Boise did in January 2017 and December 2022), the light is partially or fully blocked. Consider taller path lights (24–30 inches) for areas prone to deep snow, or use recessed hardscape lights in walls and steps that remain visible above snowpack.
Freeze-thaw and fixture durability
The Treasure Valley experiences 150+ freeze-thaw cycles per winter. Water that enters a fixture during a warm day will freeze overnight, cracking housings and ruining connections. Look for fixtures with an IP65 or higher rating (dust-tight, water-jet resistant). Brass and copper fixtures last decades; aluminum and plastic will show corrosion within 3–5 years.
Transformer and wire protection
Mount transformers above potential snow depth — at least 24 inches off the ground, under an eave if possible. Bury wire runs at least 6 inches deep (12 inches is better) to protect against shovels, aerators, and settling frost. Use direct-burial wire (UL-listed for underground use) — never indoor wire, even in conduit.
Astronomical timer adjustment
If your transformer uses a simple photocell, it will turn on at dusk and off at dawn — running 14+ hours per night in December. An astronomical timer adjusts on/off times based on your location and date, so lights can turn off at 11 PM regardless of season. This saves significant electricity in winter. Smart transformers (controlled via app) offer the most flexibility, including scheduling different zones independently.
Energy costs and LED efficiency
Modern LED landscape lighting is remarkably cheap to operate. A typical 20-fixture system using 4-watt LEDs draws 80 watts total. Running 6 hours per night (dusk to 11 PM), that is 0.48 kWh per night. At Idaho Power's residential rate of approximately $0.12 per kWh, the monthly cost is about $1.73 — less than a single incandescent porch light.
Even a large 50-fixture system (200 watts) running 8 hours per night costs only about $5.76 per month. LED bulbs also last 30,000–50,000 hours, meaning you will not change a bulb for 10–15 years under normal use.
Smart lighting controls
Wi-Fi and Bluetooth-enabled transformers let you control your landscape lighting from your phone. Popular options include the Hunter Node controller, the Hinkley Lighting hub, and the Volt Lighting app. Features worth having:
- Astronomical scheduling — automatically adjusts on/off times for your exact location and date
- Zone control — turn on patio lights for a party while leaving back yard lights off
- Dimming — reduce brightness for ambiance or to save energy
- Vacation mode — randomize on/off times to simulate occupancy
- Integration — connect to Alexa, Google Home, or Apple HomeKit for voice control
Smart controllers add $100–$300 to your system cost. For most homeowners, the scheduling and zone control features justify the expense — especially in Idaho, where sunset times shift dramatically across seasons.
Common mistakes to avoid
- Too many fixtures, too close together. The "runway" effect — a straight line of identical path lights — looks commercial and dated. Space fixtures irregularly, mix styles, and let some areas stay dark for contrast.
- Over-lighting. Landscape lighting should be subtle. If your yard looks like a parking lot, you have too many watts. Aim for pools of light with dark spaces between them.
- Ignoring glare. Bare bulbs visible from eye level are the most common mistake. Use shielded fixtures, aim lights away from seating areas and neighbor windows, and use honeycomb louvers on spot lights.
- Forgetting winter. Fixtures placed at ground level in garden beds will be buried by snow. Either raise them, use hardscape-integrated fixtures, or accept that half your lights will be invisible from December through February.
- Using mismatched color temperatures. Mixing 2700K warm lights with 4000K cool lights in the same view creates visual discord. Pick one temperature (2700K or 3000K) and use it throughout.
- No plan for maintenance. Fixtures get bumped by lawnmowers, buried by mulch, and knocked by kids. Leave enough slack in the wire to reposition fixtures, and check alignment twice a year.
Local sourcing in the Treasure Valley
Several local suppliers carry professional-grade landscape lighting in the Boise area:
- SiteOne Landscape Supply (Boise, 5365 W Irving St) — professional-grade fixtures, transformers, and wire. Carries Volt, FX Luminaire, and Unique Lighting Systems. Trade-oriented but open to homeowners.
- Home Depot and Lowe's (multiple Treasure Valley locations) — consumer-grade Hampton Bay and Portfolio brands. Good for small DIY projects, but fixture durability is lower and replacement parts are harder to find.
- D&L Rock & Landscape Supply (Nampa, 320 W Garrity Blvd) — carries hardscape lighting integrated into wall systems, plus path lights for landscape installations.
- Edison Electric (Boise) — licensed electricians for line-voltage installations, transformer panel work, and whole-home lighting control systems.
For professional design and installation, the landscape companies in our local landscaper directory can handle lighting as part of a larger project. If you are adding lighting to an existing landscape, look for companies that list "outdoor lighting" as a specialty.
Quick-start checklist for a DIY installation
- Walk your yard at night with a flashlight to identify safety zones and focal points
- Sketch a rough plan showing fixture locations, transformer location, and wire runs
- Calculate total wattage and add 20% — buy a transformer with that capacity
- Purchase fixtures, wire (12-gauge main, 16-gauge branches), connectors, and a transformer with photocell + astronomical timer
- Place fixtures temporarily (no digging yet) and test at night — adjust positions before committing
- Bury wire runs 6–12 inches deep; mount transformer 24+ inches up, under cover
- Make connections with waterproof splice caps (gel-filled), not twist-on wire nuts
- Test the system at night one more time, adjusting fixture angles and glare shields
- Set the timer schedule — consider 6 hours in summer (dusk to midnight), 4 hours in winter (dusk to 10 PM) to save energy